


 Reply With Quote
Here is some of my latest work.

Results 21 to 37 of 37
Thread: Po-boy Progression Photos.
-
06-16-2012, 09:01 PM #21
 Glass-a-holic

- Join Date
- Feb 2010
- Posts
- 183
- Rep Power
- 15
 Re: Teachmeh Progression Photos.
Thanks Rookie! Yeah its slyme and black. As far as welds go they are pretty solid.
Re: Teachmeh Progression Photos.
Thanks Rookie! Yeah its slyme and black. As far as welds go they are pretty solid. Originally Posted by The Rookie

It's all about melting the glass together so that it is all one piece. And bridging, bridging is by far the best damn thing on Earth when it comes to assembly.
I torque on them a bit to test them. I'm sort of like a lampworking zombie, I bite everybody.
click here to find po-boy on Facebook, add me!
My studio page.
My instagram page.
-
10-29-2013, 07:48 AM #22
Glass-a-holic
- Join Date
- Feb 2010
- Posts
- 183
- Rep Power
- 15
Re: Po-boy Progression Photos.
Last edited by po-boy; 10-29-2013 at 07:59 AM.
I'm sort of like a lampworking zombie, I bite everybody.
click here to find po-boy on Facebook, add me!
My studio page.
My instagram page.
-
10-29-2013, 04:01 PM #23samoth890 Lurker Re: Po-boy Progression Photos.
I like that last honeycomb spoon, really sweet colors.
-
10-29-2013, 07:25 PM #24
Banned

- Join Date
- Apr 2011
- Location
- Heaven
- Posts
- 1,405
- Rep Power
- 0
Re: Po-boy Progression Photos.
Ya baby, nice work. Black shirly's got some action goin down!
If you dont mind me askin, what size/thickness tube you start with on pinchies? I like the thickness and shape for the iso's, thick but not too thick, and the right size pinch. It would be lifetime debter.
Also, nubber thanks for bringing up the punty trick like two years ago. I like using my jaws and doin up like 20 and switching em out, but maybe I should start doing the tweezers thing.
-
10-29-2013, 07:33 PM #25
Glass-a-holic
- Join Date
- Aug 2013
- Posts
- 8
- Rep Power
- 0
Re: Po-boy Progression Photos.
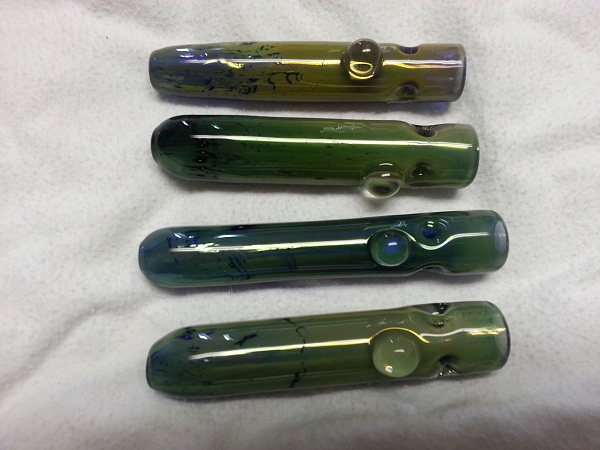
wow! i gotta say those top four wrap n rakes look amazing!!! especially the two on the right!
-
11-03-2013, 04:43 PM #26
Glass-a-holic


- Join Date
- Sep 2012
- Location
- Adelaide, South Australia, Australia
- Posts
- 295
- Rep Power
- 14
Re: Po-boy Progression Photos.
I really like your work.. those cobolt sherlies look good man. bet they sell well.

-
11-14-2013, 11:24 AM #27
Glass-a-holic
- Join Date
- Feb 2010
- Posts
- 183
- Rep Power
- 15
Re: Po-boy Progression Photos.
I start with 32mm standard wall and condense them to about 14mm. some are blown in and some are iso Originally Posted by funksizzle

thanks all! have some nice pics of 4 beakers i made but cant seem to get them to upload. will try later.I'm sort of like a lampworking zombie, I bite everybody.
click here to find po-boy on Facebook, add me!
My studio page.
My instagram page.
-
11-25-2013, 08:56 PM #28
Glass-a-holic
- Join Date
- Feb 2010
- Posts
- 183
- Rep Power
- 15
Re: Po-boy Progression Photos.
3 rigs made recently and some fire/water spoons
I'm sort of like a lampworking zombie, I bite everybody.
click here to find po-boy on Facebook, add me!
My studio page.
My instagram page.
-
11-26-2013, 03:00 PM #29
Glass-a-holic
- Join Date
- Mar 2011
- Location
- MD
- Posts
- 134
- Rep Power
- 16
Re: Po-boy Progression Photos.
Awesome progression thread. My new Fav. This def just got me the motivation to get back in the studio. I have been itching for months now. Don't find the time, make the time.
-
07-31-2014, 05:30 PM #30
Glass-a-holic
- Join Date
- Feb 2010
- Posts
- 183
- Rep Power
- 15
Re: Po-boy Progression Photos.
here are some more pics, please enjoy
Double layer (staircase) spoon inspired by JLees work
Fire/money Spoon with blown in screen and blown carb
10mm pendant rig
I'm sort of like a lampworking zombie, I bite everybody.
click here to find po-boy on Facebook, add me!
My studio page.
My instagram page.
-
07-31-2014, 06:17 PM #31
Glass-a-holic


- Join Date
- Apr 2007
- Posts
- 455
- Rep Power
- 22
Re: Po-boy Progression Photos.
What black are you using for those spoons?
-
08-04-2014, 10:39 PM #32
Glass-a-holic
- Join Date
- Feb 2010
- Posts
- 183
- Rep Power
- 15
Re: Po-boy Progression Photos.
china tube Originally Posted by sevendeuce
I'm sort of like a lampworking zombie, I bite everybody.
click here to find po-boy on Facebook, add me!
My studio page.
My instagram page.
-
08-27-2014, 02:04 PM #33
Glass-a-holic
- Join Date
- Feb 2010
- Posts
- 183
- Rep Power
- 15
Re: Po-boy Progression Photos.
Here is a recent sherlock I made. 7 fire/money sections, magnifier marbles, opal marble, multihole bowl.
I'm sort of like a lampworking zombie, I bite everybody.
click here to find po-boy on Facebook, add me!
My studio page.
My instagram page.
-
08-27-2014, 03:10 PM #34
grammar nazi


- Join Date
- Apr 2014
- Location
- MA
- Posts
- 412
- Rep Power
- 30
Re: Po-boy Progression Photos.
Your shit looks awesome. You've mentioned "blown in screen" and "multi hole bowl" - any change you could take a pic of the inside of the bowl push and show me exactly what you mean by these two terms? I'm quite curious. Thanks!
-
08-27-2014, 03:32 PM #35
Glass-a-holic
- Join Date
- Feb 2010
- Posts
- 183
- Rep Power
- 15
Re: Po-boy Progression Photos.
thanks matt! I have been sworn to secrecy and (orally) contractually obligated not to show pictures of the bowl in photos. The guy who taught me Randall Straight (str8glass on instagram) told me he would show me but I could never show people pics or disclose the details of how he does it. I refer people to him if they want to learn so please contact him. Originally Posted by mattholimeau
I am however at liberty to say that Bandhu (Scott Dunham) covers the technique in Contemporary Lampworking. although its not showing how to do a bowl he does cover how to drill holes in glass with tungsten.Last edited by po-boy; 08-27-2014 at 04:21 PM.
I'm sort of like a lampworking zombie, I bite everybody.
click here to find po-boy on Facebook, add me!
My studio page.
My instagram page.
-
09-01-2014, 04:42 PM #36
Slave of the flame.


- Join Date
- Jun 2005
- Location
- Eugene
- Posts
- 38,868
- Rep Power
- 219
Re: Po-boy Progression Photos.
I like the color combo on the sherly!
~Misha
-
09-08-2014, 06:04 PM #37
Glass-a-holic
- Join Date
- Feb 2010
- Posts
- 183
- Rep Power
- 15
Re: Po-boy Progression Photos.
Thank you! and thank you again for this website, it has been integral to my growth as a glass blower! Originally Posted by PyroChixRock
I'm sort of like a lampworking zombie, I bite everybody.
click here to find po-boy on Facebook, add me!
My studio page.
My instagram page.


Similar Threads
-
Po-Boy ISO spoon.
By po-boy in forum Pics, Galleries, and WebsitesReplies: 12Last Post: 12-16-2011, 02:00 PM
 Posting Permissions
Featured Member's Spotlight!


Donate to our forum!
Owned and operated by glassblowers for glassblowers!
"don't give up. it's more than a job, it's a lifestyle." ~mer
Bookmarks