

 Reply With Quote
i mixed up some mortar and went around the greenboard with it, covering the edge of the plywood as well.
then i layed down the aluminum sheet. i didnt do anything to specifically attach the greenboard or aluminum, just layed on top.
edit: i used some high temp silicone in between the greenboard and plywood, nothing between greenboard and aluminum.

Results 1 to 20 of 66
Thread: Shattered Dreams progression
-
03-01-2013, 10:21 AM #1
 Glass-a-holic


- Join Date
- Dec 2012
- Location
- chicago
- Posts
- 440
- Rep Power
- 19
 Shattered Dreams progression
hello,
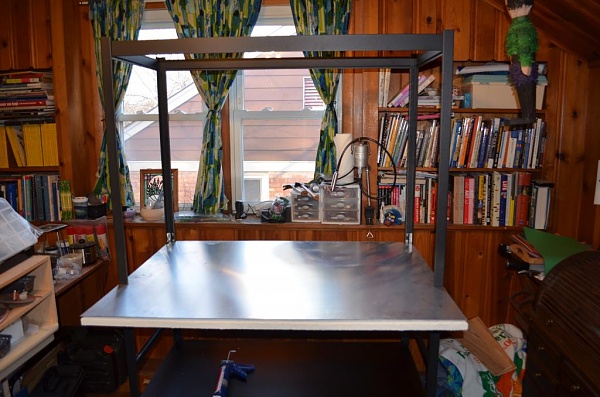
i just got my setup finished last week, here it is.
i took a 2' x 4' shelving unit and added a 3' x 4' worksurface made of 3/4" plywood screwed to the original shelf, 1/4" greenboard on top of that, and then finally a 1/16th layer of aluminum on top.
first i set the shelves where i wanted them and notched out the plywood to fit around the legs, and screwed it to the original shelf.
then i did the same with the greenboard, which i cut a little smaller to leave a 1/4" gap all around to fill with mortar, sealing the greenboard in.
i didnt know if the greenboard would crumble over time like hardibacker.
-
03-01-2013, 10:27 AM #2
Glass-a-holic
- Join Date
- Dec 2012
- Location
- chicago
- Posts
- 440
- Rep Power
- 19
Re: Shattered Dreams progression
Last edited by Shattered Dreams; 03-01-2013 at 10:46 AM.
-
03-01-2013, 10:34 AM #3
Glass-a-holic
- Join Date
- Dec 2012
- Location
- chicago
- Posts
- 440
- Rep Power
- 19
Re: Shattered Dreams progression
im waiting for some more pics to load...
i used the greenboard to make sides and the back and top, and wrapped them with aluminum flashing.
Last edited by Shattered Dreams; 03-01-2013 at 10:55 AM.
-
03-01-2013, 10:35 AM #4
Glass-a-holic

- Join Date
- Mar 2010
- Location
- Claremont NH
- Posts
- 213
- Rep Power
- 17
Re: Shattered Dreams progression
looks good so far. Is the upper frame for a hood and vent ?
-
03-01-2013, 10:39 AM #5
Glass-a-holic
- Join Date
- Dec 2012
- Location
- chicago
- Posts
- 440
- Rep Power
- 19
Re: Shattered Dreams progression
with the panels being a snug fit, i then used bolts and washers to secure them to the outer legs. the holes are drilled close to the legs, and the washers overlap the legs and hold the panels in place.
for the top i screwed a few of the scrap peices of greenboard to the top shelf, then wrapped the aluminum around the shelf and set it in place.
-
03-01-2013, 10:42 AM #6
Glass-a-holic
- Join Date
- Dec 2012
- Location
- chicago
- Posts
- 440
- Rep Power
- 19
Re: Shattered Dreams progression
originally i did plan on having a hood on top, but i ended up connecting to the back with some sort of roofing metal peice, a 9" x 14" oval peice.
-
03-01-2013, 10:42 AM #7
Maverick
- Join Date
- Jan 2013
- Location
- El Segundo, CA
- Posts
- 159
- Rep Power
- 12
Re: Shattered Dreams progression
Thats actually a really unique neat idea. If I didn't have a table already ready for lampworking I would probably actually consider doing something similar, looks like a fairly simple and easy setup to do
~J.Herbert~
-
03-01-2013, 10:48 AM #8
With fire in our veins


- Join Date
- Jan 2008
- Location
- Orland, ME
- Posts
- 1,618
- Rep Power
- 63
Great idea for an enclosure.
Will be watching to see final setup! "Destruction leads to a very rough road, but it also breeds creation."
-
03-01-2013, 10:50 AM #9
Glass-a-holic
- Join Date
- Dec 2012
- Location
- chicago
- Posts
- 440
- Rep Power
- 19
Re: Shattered Dreams progression
thanks, the posts for the legs actually come apart right at the middle, right were the table surface is.
i havent tried it yet, but i may be able to lift off the whole top enclosure to move it, unbolt a few bolts/washers, remove the worksurface, and then move the bottom.
i may be doing this as soon as it warms up, ill move out to the garage.
-
03-01-2013, 10:58 AM #10
Shifty Noob Sammich.


- Join Date
- Nov 2009
- Location
- Asheville, NC
- Posts
- 2,163
- Rep Power
- 55
Re: Shattered Dreams progression
Phew.. I'd use some high temp paint or something to coat the inside of that thing. It's going to be bright as fuck and hotter than hell with a torch raging in there. Use black, it'll absorb the heat instead of reflecting it back at you.
Quinn The Eskimo Designs
Facebook [Most up to date work here usually]
"Flower implosions are for sissy behoches, I am not a sissy behotch."
-Funksizzle
-
03-01-2013, 11:01 AM #11
Glass-a-holic
- Join Date
- Dec 2012
- Location
- chicago
- Posts
- 440
- Rep Power
- 19
Re: Shattered Dreams progression
i screwed some eye hooks into the bottom of the plywood, to hold a towel on one corner, to hold hoses out of the way, and im sure ill attach some other things down the road...
i put some slits in the funnel shaped peice in the back, in order to open it up closer to the 8" size of my fan, which is the 1500 cfm harbor freight inline fan.
here is whats going on in the back.
Last edited by Shattered Dreams; 03-01-2013 at 03:00 PM.
-
03-01-2013, 11:05 AM #12
Glass-a-holic
- Join Date
- Dec 2012
- Location
- chicago
- Posts
- 440
- Rep Power
- 19
Re: Shattered Dreams progression
i havent noticed it being hot or too bright, works great so far.
we'll see how it goes in the summer when its hot, i may bust out the paint if it'll keep me cooler,
but for now i enjoy all the warmth i can get.
oh, and eventually i will put some trim around the sides of the work surface so it looks a little cleaner, i just ran out of money
Last edited by Shattered Dreams; 03-01-2013 at 11:11 AM.
-
03-01-2013, 11:11 AM #13
Glass-a-holic
- Join Date
- Dec 2012
- Location
- chicago
- Posts
- 440
- Rep Power
- 19
Re: Shattered Dreams progression
oh, and if i wasnt so strapped for cash, i wouldve put down thicker aluminum (1/4") on the worksurface and just used aluminum panels for all the sides and top.
it wouldve been much easier to put together, but it worked out ok.
-
03-01-2013, 11:23 AM #14
Glass-a-holic
- Join Date
- Dec 2012
- Location
- chicago
- Posts
- 440
- Rep Power
- 19
Re: Shattered Dreams progression
anyone know why a few of the pics up there arent displayed, they are showing up as a link?
-
03-01-2013, 01:32 PM #15
We are with you in your anger...


- Join Date
- Nov 2007
- Posts
- 7,449
- Rep Power
- 211
Re: Shattered Dreams progression
When you follow the links, it says "invalid attachment specified". In looking at your post in an editor, you have stuff formatted right. maybe try re-uploading them, or posting them to Imgur and linking to that.
-
03-01-2013, 02:55 PM #16
Glass-a-holic
- Join Date
- Dec 2012
- Location
- chicago
- Posts
- 440
- Rep Power
- 19
Re: Shattered Dreams progression
strange thing about the pics, they were there at first.
ill try to go back and edit.
thanks
-
03-02-2013, 02:37 PM #17
Glass-a-holic
- Join Date
- Jul 2011
- Location
- San Antonio, TX
- Posts
- 328
- Rep Power
- 14
Re: Shattered Dreams progression
Great work. Explained well too. I think a good point was made about the reflection from the sheeting. I would put casters on the bottom and a quick way of detaching the vent fan and it's easily moveable for window access, what-have-you. Thanks for sharing.
-
03-02-2013, 08:19 PM #18
Glass-a-holic
- Join Date
- Dec 2012
- Location
- chicago
- Posts
- 440
- Rep Power
- 19
Re: Shattered Dreams progression
right now the 8" 90 crimped end slips into a collar of aluminum flashing that adapts it to the fan, it might be hard to tell in the pics.
its tricky, but it slips in and out and its not even taped at that joint.
at first i was concerned it may be a little tipsy, so i planned on using 90* brackets to mount the legs to the 2x4s it sits on (partially there for sturdiness, also so the metal legs dont scratch up the floor when i move it around), but its actually pretty sturdy and nochance of it tipping really. casters would make it even easier to move though.
anyways... ill have to start putting up some pics of glass now that the setup is out of the way.
i attempted my first spoon last night. failure.
but i learned a lot from it and think i might be able to pull it off next time.
what i tried was to even out the end of some 1" tube, then pop a hole.
cold sealed a blowtube over the hole, and melted off the rest of the 1" to give me a 3-4" blank.
i blew out the bubble popped the hole and pushed the bowl, but the hole opened up enough to stick my finger in.
plugged it with the push to pop the carb, then stretched the neck. unevenly and too far from the bubble.
so i learned a little and am almost through the half tank of oxy that came with my startup gear.
maybe i can make a decent spoon by the end of it. or maybe ill just use the last of it getting punties, blowtubes, and blanks prepped.
ill post pics of my first fuming attempts once i get them off the camera.
also, i realise there are many ways to make something but the way i described for the spoon seemed easiest while trying to plan ahead. i dont know if anyone else does it like that. i could blow the bubble, pop hole,push, pop carb, punty up, stretch neck, melt off the rest of the tubing, and just deal with breaking or tearing or poking the mouthpeice open, i just havent tried that stuff yet so it seemed easier to get the mouthpeice hole open first.
i ordered up a little bit of color from the ga sale, 2 lbs of ruby cause its cheap, and 1 lb each of black pearl and lapis. just something to mess around with cause im already tired of all this clear.
im thinking of ordering a case of blue-green tubing, has anyone used some and what did you think of it? i just realised its asian, but at ~ 6/lb its almost the same price as american clear. i guess cheap glass is better to practice on, why waste expensive glass...
-
03-02-2013, 11:13 PM #19
It's complex!
- Join Date
- Jan 2011
- Location
- Ventura, CA
- Posts
- 234
- Rep Power
- 16
Re: Shattered Dreams progression
That's a clean setup Shattered! Simple and effective.
-
03-02-2013, 11:23 PM #20
Glass-a-holic
- Join Date
- Jul 2012
- Posts
- 74
- Rep Power
- 12
Re: Shattered Dreams progression
Love the setup....
BUT WHERES THE GLASS!
sorry, I love progression threads and wanna see what you start with
Cleaner then my getup!


Similar Threads
-
dreams are becoming a reality
By VED in forum Glass DiscussionReplies: 14Last Post: 10-14-2007, 04:40 PM
 Posting Permissions
Featured Member's Spotlight!


Donate to our forum!
Owned and operated by glassblowers for glassblowers!
"don't give up. it's more than a job, it's a lifestyle." ~mer
Bookmarks