

 Reply With Quote
howdee,
Not an expert but I suggest you play around with the angle of heating the glass like go from 45 degrees pointing down to a full 90 degrees vertical. Also how and when you compress the glass effects the interior glass movement. Also as I understand it compression is the tech for rods and implosion (a much cooler name) is the tech for tubes.

Results 1 to 20 of 37
Thread: Implosion
-
01-19-2013, 05:32 PM #1
 Glass-a-holic

- Join Date
- Dec 2005
- Location
- Trinidad, West Indies
- Posts
- 53
- Rep Power
- 19
 Implosion
Is there a limit to how far up the colors can go? Is there a trick to make it extend further inside? I am getting like half up inside.
I am using the normal implosion ie not the tube kind.
Thanks for your hints.
Franklin
-
01-19-2013, 07:13 PM #2
Glass-a-holic
- Join Date
- Jul 2010
- Posts
- 211
- Rep Power
- 14
Re: Implosion
-
01-19-2013, 08:39 PM #3
Borovangelist


- Join Date
- Jul 2006
- Location
- Auburn, MA
- Posts
- 5,872
- Rep Power
- 119
Re: Implosion
There is a limit, eventually they'll start to curve inwards which just weird.
Like Zip said, pay attention to the angle you're melting at, and when you do a press on the marver, go super gentle with it. It's possible to flatten out your design if you push too hard.Never gonna give you up, never gonna let you down. Never gonna run around, and desert you.
-
01-19-2013, 09:23 PM #4
Armadillo Art Glass Initiative


- Join Date
- Mar 2006
- Location
- Texas
- Posts
- 5,762
- Rep Power
- 157
Re: Implosion
I am the queen of flat implosions.

Aymie
-
01-19-2013, 11:29 PM #5
Glass-a-holic

- Join Date
- Mar 2011
- Posts
- 785
- Rep Power
- 22
Re: Implosion
how thick is the disk you are starting with, franklin?
-
01-20-2013, 03:35 AM #6
Glass-a-holic
- Join Date
- Dec 2005
- Location
- Trinidad, West Indies
- Posts
- 53
- Rep Power
- 19
Re: Implosion
The disk was about 1.25 ins and he thickness was about .25 ins. Originally Posted by LarryC

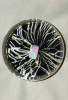
Trying to post pic. Sorry about the scrappy colors, I am just practicing with scrap stain glass and Fhc clear.
Thanks for all the replies. I am holding it up but maybe I am not working it enough. Is that a possibility.
Franklin
-
01-20-2013, 06:15 AM #7
Glass-a-holic
- Join Date
- Jul 2012
- Location
- Saint Petersburg, Florida, United States
- Posts
- 1,633
- Rep Power
- 23
Re: Implosion
If you want the petals to be closer to the lens you have to start out with a much thinner disc. Instead of just pressing the gather to create a maria, create the maria and quickly use a masher and flatten the maria outward from the rod. So it will push the glasss out wider and thin the disc up at the same time. You have to be very accurate with this because if your final flattened maria is not round it will throw of the rest of te marble. So make sure you start out with a perfectly round disc. Then a suggestion I have is to use a tungsten poke to mark dead center in your disc. When the disc gets that large it's kinda tricky to find dead center.
This is what you are trying to achieve correct?
Can "nothing" exist?
-
01-20-2013, 08:10 AM #8
Glass-a-holic


- Join Date
- May 2012
- Location
- Bennington, Vermont, United States
- Posts
- 5,473
- Rep Power
- 82
Re: Implosion
if you want to really get an understanding of when/why/how a compression does what it does, do this:
take a small maria, maybe 3/4" diameter, and pretty thin less then 1/4". draw a circle in the center of the maria, about the size of a dime (doesnt matter what color you use for this) and melt it in. now implode it, but make no compressions on the marver. do this with two different marias....on one hold the punty/handle 90 degrees to your table (elbow up). on the other, hold the punty/handle parallel to the table (slight elbow down).
as the maria is imploding keep an eye on how the implosion develops. in the end, even if you do everything the same (save for the angle you implode at) you'll see two distinctly different looking results.
doing this has helped me get a better understanding of what is happening in the glass.
Role, you are a jerk but you were right.....i was adding way too much lens material to my flower mibs.You shouldn't be having sex for pleasure, only for reproduction.
Thousands of people read my threads now. So Im trying to not embarrass myself.
-
01-20-2013, 03:43 PM #9
Glass-a-holic
- Join Date
- Dec 2005
- Location
- Trinidad, West Indies
- Posts
- 53
- Rep Power
- 19
Re: Implosion
Nice marble Rogue, thanks for the pic. Yes that is what i wanted.
Glass a holic , love the experiment.
Thanks. Hints much appreciated.
Franklin
-
01-20-2013, 05:20 PM #10
Glass-a-holic
- Join Date
- Jul 2012
- Location
- Saint Petersburg, Florida, United States
- Posts
- 1,633
- Rep Power
- 23
Re: Implosion
Use the tips I posted to get the flower that deep. If you need some clarification I will do my best.
Can "nothing" exist?
-
01-20-2013, 11:16 PM #11
Glass-a-holic
- Join Date
- Mar 2011
- Posts
- 785
- Rep Power
- 22
Re: Implosion
the thinner the disk, the closer the petals will be to the front of the lens.
-
01-21-2013, 08:11 AM #12
Glass-a-holic
- Join Date
- Mar 2010
- Location
- Kalamazoo, MI
- Posts
- 226
- Rep Power
- 21
Re: Implosion
Another way is to start with more clear glass than you need, make your flower, then remove excess clear from the top.
-
01-21-2013, 01:05 PM #13
Four Letter Word, starts with F.
- Join Date
- Jun 2005
- Location
- Orange,California
- Posts
- 3,423
- Rep Power
- 72
Re: Implosion
^ consider that an advanced step, the basics are what this guy needs.
I improved my rod compressions when I:
Only applied heat with the rod horizontal,
Didn't mash it down on the marver, used the elbow down instead at times, Too much mashing causes petals to point back around toward the base or flatten, (which I consider janky)
Stayed away from the center of the maria when applying color, leaving a quarter inch blank in the center,
Tried different sized rod for making the maria, like 12mm with a piece of 20mm as my work space.
You can make your maria thin by pressing it down and using a paddle on the topside while turning. This helped me SO much.
Also: try applying color to a pointed cone,or even a length
of rod, it doesn't have to be a maria, but that's also a little more advanced.
I hope it helps you or anyone reading this.
-
01-21-2013, 04:48 PM #14
Glass-a-holic
- Join Date
- Dec 2005
- Location
- Trinidad, West Indies
- Posts
- 53
- Rep Power
- 19
Re: Implosion
Thanks for all the replies. Looks like thinner is better. It's the first time I heard about using a pointed cone. Anyone else used that trick. Sounds very strange. But I will leave it for later. Need to practice making the Maria as thin as possible.
Franklin
-
01-21-2013, 05:06 PM #15
Armadillo Art Glass Initiative
- Join Date
- Mar 2006
- Location
- Texas
- Posts
- 5,762
- Rep Power
- 157
Re: Implosion
I press my Maria, then set the punty on my Torch marver so the Maria is up against the side, and use my paddle to press it thin and flat.
Aymie
-
01-21-2013, 07:45 PM #16
Four Letter Word, starts with F.
- Join Date
- Jun 2005
- Location
- Orange,California
- Posts
- 3,423
- Rep Power
- 72
Re: Implosion
^ yes torch mounted marver works awesome for that. I still don't have one that fits my Phantom, just the leftover one from my cc.
Any tips on a conversion?
-
01-21-2013, 07:49 PM #17
Four Letter Word, starts with F.
- Join Date
- Jun 2005
- Location
- Orange,California
- Posts
- 3,423
- Rep Power
- 72
Re: Implosion
OK, pointed cone:
Decorate pointed cone with dots, lines whatever... melt in completely, heat glass below the cone (the lens material) until the cone turns into a dome.
Mash that bitch into a maria, melt round again, be amazed.
It should take you 3 or 4 tries to get it, but once you do you'll find some designs are best suited for this tech.
-
01-21-2013, 07:52 PM #18
aka Barry Allen
- Join Date
- Apr 2012
- Posts
- 3,834
- Rep Power
- 60
Re: Implosion
i would look at the design for the phantom and copy that. probably use some sheet metal, some tin snips and screws
-
01-21-2013, 10:24 PM #19
Four Letter Word, starts with F.
- Join Date
- Jun 2005
- Location
- Orange,California
- Posts
- 3,423
- Rep Power
- 72
Re: Implosion
Oh, derp to me. Thank you.
-
01-22-2013, 01:57 AM #20
Glass-a-holic
- Join Date
- Jan 2013
- Posts
- 5
- Rep Power
- 0
Re: Implosion
try applying color to a pointed cone,or even a length


Similar Threads
-
Help with Implosion!
By Satori in forum Glass DiscussionReplies: 9Last Post: 09-20-2006, 02:17 PM -
New Implosion Vortex's
By Arcane Glass in forum Glass Art for Sale and WantedReplies: 1Last Post: 06-28-2006, 07:21 PM
 Posting Permissions
Featured Member's Spotlight!


Donate to our forum!
Owned and operated by glassblowers for glassblowers!
"don't give up. it's more than a job, it's a lifestyle." ~mer
Bookmarks